As a former club manager one of the things that was always really obvious to me when interviewing a potential hire was that a more experienced trainer had a good cueing vocabulary and often repeated useful cues across different exercises (i.e. core, posture, breathing and motivation,).
A new trainer tended to have a hard time finding the right words, they would stutter or get stuck, they would cue all over the place (i.e. from feet, to breathe, to the piece of equipment, to why it was a good exercise, to where the client should feel it, etc.) or they would repeat themselves a couple of times and typically take so long explaining that the flow of the workout and the desired heart rate would fall off.
Can you relate? (Or is this your worst fear?!)
Now, I totally understand that an interview is a stressful experience, but I’ve also seen, time and again, that this same comfort (or lack thereof) translates into client sessions until practice and experience level out.
What I’m offering here is a quicker route to competence and a way to shrink the gap on creating a successful client experience vs months or years in a fitness career. It’s an industry trend that many new trainers actually quit before achieving 6 months in the role.
That’s crazy, but at the same time, we can’t really expect someone to achieve mastery in that small amount of time. I’m a big fan of lifelong learning so there will always be tons of things to explore, but one of the most important things for a new trainer to practice is cueing.
(I’m basing this on the assumption that a new trainer is someone who has much more personal experience in their own fitness journey than the amount of time they have been working on a fitness career. Being able to move properly is crucial as a fitness professional, so cueing needs to be built on a foundation of movement mastery.)
So, here’s a perfect formula to make learning this skill easier.
PRE-FRAME: what, why, how
PILLAR: set up neutral and establish understanding of load or tension
MOVE: get them started and allow a couple reps for them to find it
TEMPO: manage breathing & time under tension
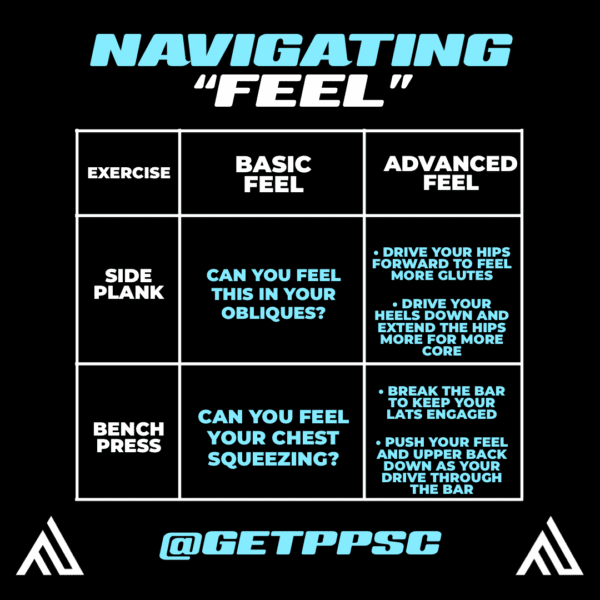
FEEL: fine tune and help client learn what right feels like
MOTIVATE: finish strong
PRE-FRAME
One of the things I hate to hear is that someone has worked with a trainer and at the end of the sessions they still don’t know the names of exercises, they aren’t comfortable in the gym and they don’t feel like they learned about their body in a way that elevated their confidence and allowed them to continue training successfully on their own.
Let’s talk about movement as a language. As trainers then, we are trying to help a client learn proper grammar (form,) increase vocabulary (learn new exercises,) or get immersed in the richness of culture vs just read out of a textbook (getting motivated/getting a kick in the butt/getting better results that working out alone.)
As I was reading up on language acquisition there were a couple things that stood out:
Context
Practice/Repetition
Imagination
Vocabulary
The more you know, the more you’ll learn.
(Language acquisition is a fascinating subject in its own right; feel free to check out the links at the bottom of the blog for a look at some of the things I browsed prior to writing this.)
What it came down to as I put this cueing formula together was that linking some really important and simple words/concepts with teaching our client an exercise was going to increase their understanding, execution, confidence and retention of the information so they would be more likely to remember over multiple sessions and/or try the exercise on their own.
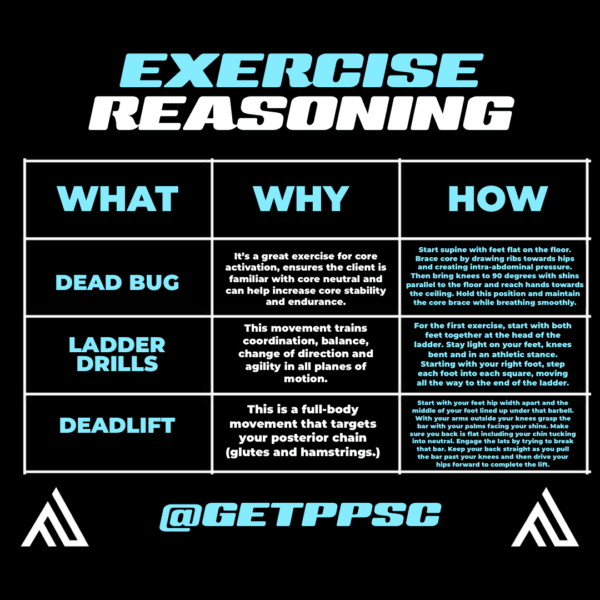
Pre-framing an exercise is telling them just a little bit about it so they know the name of it, why they should be performing it and how to do it. In other words, WHAT, WHY and HOW.

PILLAR
If you read the “How” column above you’ll realize that this is pretty much this. So, the pre-framing and pillar breathe & brace happen pretty seamlessly.
But I gave pillar a separate category because, depending on the exercise, there can be a lot to cover. Also, when the exercise is really new, we should always demo it. So, we’ll be talking through the how while we are the ones executing the movement. We want to ensure we offer a few really key set-up cues when it’s our client’s turn.
The most effective way to make this step work is to think about hips-spine-shoulders and which parts of their body are touching the floor or equipment. We can quickly activate stabilizers or help the client create postural tension by getting them to breathe & brace. This is also your time to ensure they have achieved core neutral and demonstrate good posture before they start moving.


MOVE
If you’ve done a good job of pillar (breathe & brace,) your client is already set and so move can be a simple cue that gets them going. As long as they look safe it’s ok the give them a couple of reps to “find” the movement. A simple directional cue can do the trick and/or a light touch to identify ROM or the working muscle is helpful.
I.e., Verbal cue – Squat “ok you’re ready to go. Push your hips back like you’re reaching for a chair.”
I.e., Tactile cue – touch between shoulder blades for a row exercise.
I.e., Tactile cue – show them how high is enough for their back leg on a bird dog by holding your hand above their calf.
TEMPO & BREATH
Once your client is moving successfully you can cue tempo because lots of people move too fast. First of all, if you demonstrated the exercise with the tempo you want them to use, they are likely to mimic you. Failing that, you can count tempo for them.
I.e., for a 4010 tempo Squat
“Down – 3 – 2 – 1 – up. Down – 3 – 2 – 1 – up. Don’t beat me to the bottom. Down – 3 – 2 – 1 – up. Good job, keep that tempo.”
Once they’ve got it move on. Worse than being a rep counter is being a metronome! But keep an eye out – at the end of the set, they might speed up again!
We also want to ensure they are breathing properly. In general, we cue “exhale to exert” so they should be breathing out during the concentric movement of the exercise. For isometric exercises it’s really common for people to hold their breath, so in this case we would cue “steady breathing” depending on the overall cardiorespiratory load of the workout.
Reminding them that, “The exhale helps increase core stability” or “the exhale gives you more strength” is an example of adding WHY back into the mix. Always a powerful tool for increase compliance.
FEEL
Before we dive into feel I just want to say this. There is such a thing as talking too much.
Especially when your client is new to exercise. If the pre-frame, breathe & brace, move and tempo/breath have already been a lot, we could just let them finish the set and then add additional layers in future sets.
It can be stressful when the trainer is saying so much that the client doesn’t feel like they are getting anything down before the next cue comes flying at them! (I’m sometimes guilty of this, especially on caffeinated days!)
However, feel is where we can really create confidence for the client. Make sure they feel the right muscles working, feel the strength of proper posture, feel the smoothness and power of getting the timing right (i.e., Kettlebell swings.) This is where your cueing can really evolve and add loads of value to the training session.

MOTIVATE
They’ve had a great set, now you want to make sure they finish strong! We’ve all heard the basics like “push!” “2 more!” and “feel the burn” but the real key to motivation is remembering your client’s WHY!
The words they used when they explained why their goal was important to them and why they wanted to get started or why they needed your help.
In the CPT I teach, we help students identify a clients’ buzzwords and we even recommend writing them down on the clients’ workout template so we get it right. If we don’t write it down, we are more likely to use our own words or generic ones. Imagine the power of:
“You can do this – let’s get that wedding dress fitting perfectly!”
“Come on Paul, your glutes burning means your back is going to be safe and strong at work!”
“Dig deep and finish Sandee – I see you crossing that finish line with a huge empowered grin on your face!”
“1 more set Alex, you’re an athlete – Ultimate try-outs are next month!”
In these examples the buzzwords are:
Athlete
Empowered
Strong
and wedding!
Whether you are in an orientation session or working with a client on a long-term goal, hearing their own words spoken back to them shows your client that you were listening, that you understand what’s important to them and those words will help motivate them to their best effort and that paints you as a connected, empathetic and focused trainer!
The Perfect Cueing Formula:
PRE-FRAME
PILLAR
MOVE
TEMPO
FEEL
MOTIVATE
Let’s put this all together and take a look at an example.
Client scenario: 45-year-old female, Sharon, who is very new to exercise, works sitting at a computer all day and has some mild back pain (but has been cleared for exercise.) Her goal is to learn a simple routine she can do at the gym a couple days a week so that she can lose some weight and have better posture so her back pain doesn’t get worse.


When I was a new trainer, knowing that I remembered things best by writing them down, I would actually create a chart like this on the back of my workout programs.
This helped me script the most important things to say and if I ever got nervous in a session and forgot my cues, I could just flip the page over for a quick reminder.
At first, I worried that my clients might think this was lame, but one of my first clients, a nurse, told me that she thought this was a great idea. And she was impressed that I took the time to be so well prepared for our sessions.
There’s no magic pill that replaces practice. Repetition is an undeniable key to success. We know this when it comes to learning a new exercise or a sport, a musical instrument or studying for a test.
Cueing and upgrading your trainer vocabulary are no different. But hopefully this formula gives you a structure to start with and a framework to apply to your sessions.
The only other advice I can share is take one step at a time. If all 6 steps feel like too much to do at once, start with the Pre-Frame. Try adding that to your sessions for a couple of weeks and see how it goes.
See how your client responds. And notice how you feel as well. As you build confidence, keep adding in the layers. Once you’ve done enough “reps” you won’t have look write it out ahead of time, you won’t have to look at the back of your paper, and you’ll cue more naturally.
In addition to a ton of passion and aspiration movement mastery, you’ll have the vocabulary and ease of cueing that will give your clients a really successful experience in their sessions with you.
Communication is a super valuable skill and can’t ever be replaced by YouTube, a fitness app or a program on a piece of paper!


